Use secrets management in Sensu
COMMERCIAL FEATURE: Access the Env, CyberArkProvider, and VaultProvider secrets provider datatypes in the packaged Sensu Go distribution. For more information, read Get started with commercial features.
Sensu’s secrets management allows you to avoid exposing secrets like usernames, passwords, and access keys in your Sensu configuration.
In this guide, you’ll learn how to use Sensu’s Env secrets provider, CyberArk Conjur, or HashiCorp Vault as your external secrets provider and authenticate without exposing your secrets.
You’ll set up your PagerDuty Integration Key as a secret, create a PagerDuty handler definition that requires the secret, and configure a pipeline that includes the PagerDuty handler.
Your Sensu backend can then execute the pipeline with any check.
To follow this guide, install the Sensu backend, make sure you have at least one Sensu agent running, and install and configure sensuctl.
Secrets are configured via secrets resources.
A secret resource definition refers to the secrets provider (Env, CyberArkProvider, or VaultProvider) and an ID (the named secret to fetch from the secrets provider).
This guide only covers the handler use case, but you can use secrets management in handler, mutator, and check execution. When a check configuration references a secret, the Sensu backend will only transmit the check’s execution requests to agents that are connected via mutually authenticated transport layer security (mTLS)-encrypted WebSockets.
The secret included in your Sensu handler will be exposed to Sensu services at runtime as an environment variable. Sensu only exposes secrets to Sensu services like environment variables and automatically redacts secrets from all logs, the API, and the web UI.
Retrieve your PagerDuty Integration Key
The example in this guide uses the PagerDuty Integration Key as a secret and a PagerDuty handler definition that requires the secret.
Here’s how to find your Integration Key in PagerDuty so you can set it up as your secret:
- Log in to your PagerDuty account.
- In the Services drop-down menu, select Service Directory.
- Enter the name of your Sensu service in the search field.
- Click to select your Sensu service from the list of search results.
- Click the Integrations tab.
- Click the drop-down arrow for the Events API. The Integration Key is listed in the second field.
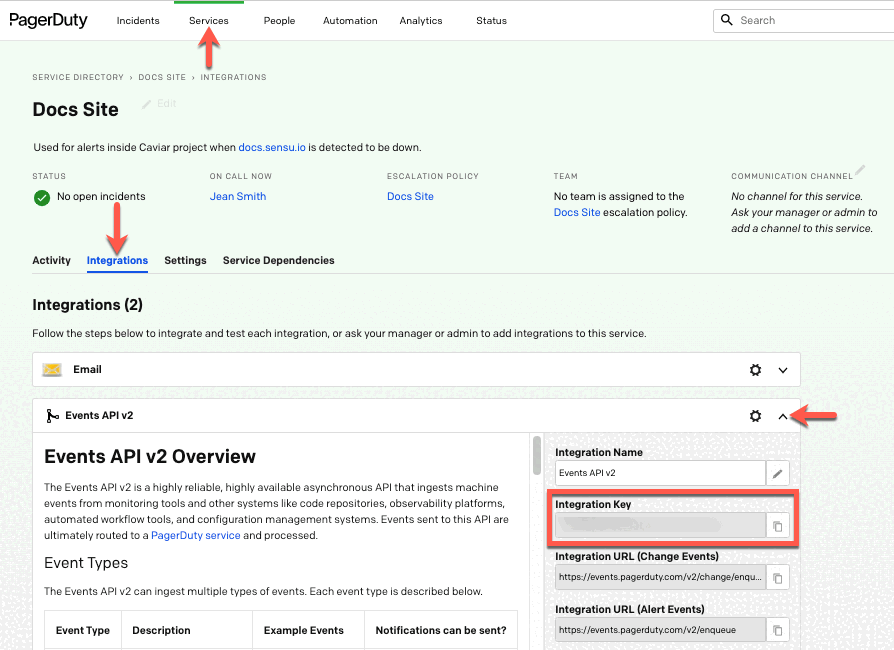
Make a note of your Integration Key — you’ll need it to create your backend environment variable or secret.
Next, configure your secrets provider:
- Env (Sensu’s built-in secrets provider)
- CyberArk Conjur
- HashiCorp Vault
Use Env for secrets management
The Sensu Go commercial distribution includes a secrets provider, Env, that exposes secrets from environment variables on your Sensu backend nodes.
The Env secrets provider is automatically created with an empty spec when you start your Sensu backend.
Create your backend environment variable
To use the Env secrets provider, add your secret as a backend environment variable.
First, make sure you have created the files you need to store backend environment variables.
Then, run the following code, replacing INTEGRATION_KEY with your PagerDuty Integration Key:
echo 'SENSU_PAGERDUTY_KEY=INTEGRATION_KEY' | sudo tee -a /etc/default/sensu-backendecho 'SENSU_PAGERDUTY_KEY=INTEGRATION_KEY' | sudo tee -a /etc/sysconfig/sensu-backendRestart the sensu-backend:
sudo systemctl restart sensu-backendThis configures the SENSU_PAGERDUTY_KEY environment variable to your PagerDuty Integration Key in the context of the sensu-backend process.
Create your Env secret
Now you’ll use sensuctl create to create your secret.
This code creates a secret named pagerduty_key that refers to the environment variable ID SENSU_PAGERDUTY_KEY.
Run:
cat << EOF | sensuctl create
---
type: Secret
api_version: secrets/v1
metadata:
  name: pagerduty_key
spec:
  id: SENSU_PAGERDUTY_KEY
  provider: env
EOF
cat << EOF | sensuctl create
{
"type": "Secret",
"api_version": "secrets/v1",
"metadata": {
"name": "pagerduty_key"
},
"spec": {
"id": "SENSU_PAGERDUTY_KEY",
"provider": "env"
}
}
EOFYou can securely pass your PagerDuty Integration Key in Sensu checks, handlers, and mutators by referring to the pagerduty_key secret.
Continue to the add a handler section to use the pagerduty_key secret in your handler definition.
Use CyberArk Conjur for secrets management
This section explains how to use CyberArk Conjur as your external secrets provider.
Before you begin, follow the Conjur documentation to install and start the Conjur OSS environment and the Conjur CLI.
Create a Conjur account
In the Conjur Docker container, run the following command to create a sensu.io account and initialize the admin user:
docker-compose exec conjur conjurctl account create sensu.ioThe response should confirm that Conjur created the sensu.io account and include an admin API key. For example:
Created new account 'sensu.io'
Token-Signing Public Key: -----BEGIN PUBLIC KEY-----
MIIBIjANB...
-----END PUBLIC KEY-----
API key for admin: 5pj0kdx56npm8gksd9gre69sb21vh7zws2nk8jy73ekcyjk8e0xdj3
Write and load a Conjur policy with the secrets variable and host
Use the Conjur CLI to load a policy and secrets for Sensu to use.
-
Initialize the Conjur CLI client to use the sensu.io account and point it at the correct URL:
conjur init -u conjur -a sensu.ioThe response should confirm that initialization succeeded:
Wrote configuration to /root/.conjurrc -
Write a Conjur policy that defines a human user, a non-human identity that represents a Sensu backend, at least one secret variable, permissions for the human user, and a host for the Sensu backend to use:
cat << EOF > /tmp/policy.yaml - !policy id: Sensu body: - !user SensuAdmin - !host sensuBackend - !variable id: pagerDutyAPIKey - !permit role: !user SensuAdmin privileges: [read, update, execute] resource: !variable pagerDutyAPIKey - !permit role: !host sensuBackend privileges: [read, execute] resource: !variable pagerDutyAPIKey EOF -
Load the policy:
conjur policy load root /tmp/policy.yamlNOTE: Conjur will prompt for your username and password. Enter the username (
admin) and password (the API key for admin) for the sensu.io account. This information is included in the response to the command to create a Conjur account.The response should include a list of created roles and credentials, similar to this example:
Loaded policy 'root'
{
  "created_roles": {
    "sensu.io:user:SensuAdmin@Sensu": {
      "id": "sensu.io:user:SensuAdmin@Sensu",
      "api_key": "25xjdpm21p3obl2yw7w4d1xmvzj32psjbps3ftaj1e32rb94y3q3xge1"
    },
    "sensu.io:host:Sensu/sensuBackend": {
      "id": "sensu.io:host:Sensu/sensuBackend",
      "api_key": "2j78g5k0fb56fafsdoslehsaf246f092wmwkvh1qrgchk1tt8x8c"
    }
  },
  "version": 1
}
Copy and save the API key value for the sensu.io:host:Sensu/sensuBackend role — you will need it when you create your CyberArkProvider secrets provider in Sensu.
-
Use the Conjur CLI to set the pagerDutyAPIKey secret, replacing
<INTEGRATION_KEY>with your PagerDuty Integration Key:conjur variable values add Sensu/pagerDutyAPIKey <INTEGRATION_KEY>You should receive the response
Value added.
Create your Conjur secrets provider
Use sensuctl create to create your secrets provider, conjur.
In the code below, replace <API_KEY> with the API key value for the sensu.io:host:Sensu/sensuBackend role.
Then, run:
cat << EOF | sensuctl create
---
type: CyberArkProvider
api_version: secrets/v1
metadata:
  name: conjur
spec:
  client:
    account: sensu.io
    appliance_url: http://localhost:8480
    login: host/Sensu/sensuBackend
    api_key: <API_KEY>
    timeout: 1s
    ttl: 60s
EOF
cat << EOF | sensuctl create
{
"type": "CyberArkProvider",
"api_version": "secrets/v1",
"metadata": {
"name": "conjur"
},
"spec": {
"client": {
"account": "sensu.io",
"appliance_url": "http://localhost:8480",
"login": "host/Sensu/sensuBackend",
"api_key": "<API_KEY>",
"timeout": "1s",
"ttl": "60s"
}
}
}
EOFCreate your Conjur secret
Use sensuctl create to create your secret:
cat << EOF | sensuctl create
---
type: Secret
api_version: secrets/v1
metadata:
  name: pagerduty_key
spec:
  provider: conjur
  id: Sensu/pagerDutyAPIKey
EOF
cat << EOF | sensuctl create
{
"type": "Secret",
"api_version": "secrets/v1",
"metadata": {
"name": "pagerduty_key"
},
"spec": {
"provider": "conjur",
"id": "Sensu/pagerDutyAPIKey"
}
}
EOFNow you can securely pass your PagerDuty Integration Key in the handlers and mutators by referring to the pagerduty_key secret.
Continue to the add a handler section to use the pagerduty_key secret in your handler definition.
Use HashiCorp Vault for secrets management
This section explains how to use HashiCorp Vault as your external secrets provider to authenticate via the HashiCorp Vault integration’s token auth method or TLS certificate auth method.
NOTE: You must set up HashiCorp Vault to use VaultProvider secrets management in production.
The examples in this guide use the Vault dev server, which is useful for learning and experimenting.
The Vault dev server gives you access to a preconfigured, running Vault server with in-memory storage that you can use right away.
Follow the HashiCorp Learn curriculum when you are ready to set up a production server in Vault.
In addition, this guide uses the Vault KV secrets engine.
Using the Vault KV secrets engine with the Vault dev server requires v2 connections.
For this reason, in the VaultProvider spec in these examples, the client version value is v2.
Configure your Vault authentication method (token or TLS)
If you use HashiCorp Vault as your external secrets provider, you can authenticate via the HashiCorp Vault integration’s token or transport layer security (TLS) certificate authentication method.
Vault token authentication
Follow the steps in this section to use HashiCorp Vault as your external secrets provider to authenticate with the HashiCorp Vault integration’s token auth method.
Retrieve your Vault root token
NOTE: The examples in this guide use the Root Token for the the Vault dev server, which gives you access to a preconfigured, running Vault server with in-memory storage that you can use right away.
Follow the HashiCorp Learn curriculum when you are ready to set up a production server in Vault.
To retrieve your Vault root token:
- Download and install the Vault edition for your operating system.
- Open a terminal window and run
vault server -dev.
The command output includes a Root Token line.
Find this line in your command output and copy the Root Token value.
You will use it next to create your Vault secrets provider.
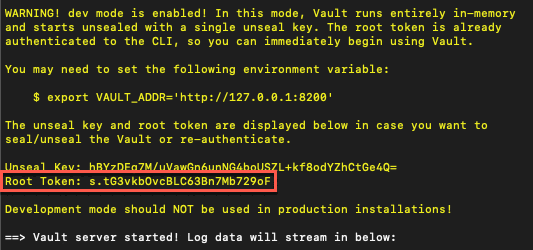
Leave the Vault dev server running.
Because you aren’t using TLS, you will need to set VAULT_ADDR=http://127.0.0.1:8200 in your shell environment.
Create your Vault secrets provider
NOTE: In Vault’s dev server, TLS is not enabled, so you won’t be able to use certificate-based authentication.
Use sensuctl create to create your secrets provider, vault.
In the code below, replace <root_token> with the Root Token value for your Vault dev server.
Then, run:
cat << EOF | sensuctl create
---
type: VaultProvider
api_version: secrets/v1
metadata:
  name: vault
spec:
  client:
    address: http://localhost:8200
    token: <root_token>
    version: v2
    tls: null
    max_retries: 2
    timeout: 20s
    rate_limiter:
      limit: 10
      burst: 100
EOF
cat << EOF | sensuctl create
{
"type": "VaultProvider",
"api_version": "secrets/v1",
"metadata": {
"name": "vault"
},
"spec": {
"client": {
"address": "http://localhost:8200",
"token": "<root_token>",
"version": "v2",
"tls": null,
"max_retries": 2,
"timeout": "20s",
"rate_limiter": {
"limit": 10,
"burst": 100
}
}
}
}
EOFTo continue, skip ahead to create your Vault secret.
Vault TLS certificate authentication
This section explains how use HashiCorp Vault as your external secrets provider to authenticate with the HashiCorp Vault integration’s TLS certificate auth method.
NOTE: You will need to set up HashiCorp Vault in production to use TLS certificate-based authentication. In Vault’s dev server, TLS is not enabled. Follow the HashiCorp Learn curriculum when you are ready to set up a production server in Vault.
First, in your Vault, enable and configure certificate authentication. For example, your Vault might be configured for certificate authentication like this:
vault write auth/cert/certs/sensu-backend \
    display_name=sensu-backend \
    policies=sensu-backend-policy \
    certificate=@sensu-backend-vault.pem \
    ttl=3600
Second, configure your VaultProvider in Sensu:
---
type: VaultProvider
api_version: secrets/v1
metadata:
  name: vault
spec:
  client:
    address: https://vault.example.com:8200
    version: v2
    tls:
      ca_cert: /path/to/your/ca.pem
      client_cert: /etc/sensu/ssl/sensu-backend-vault.pem
      client_key: /etc/sensu/ssl/sensu-backend-vault-key.pem
      cname: sensu-backend.example.com
    max_retries: 2
    timeout: 20s
    rate_limiter:
      limit: 10
      burst: 100
{
"type": "VaultProvider",
"api_version": "secrets/v1",
"metadata": {
"name": "vault"
},
"spec": {
"client": {
"address": "https://vault.example.com:8200",
"version": "v2",
"tls": {
"ca_cert": "/path/to/your/ca.pem",
"client_cert": "/etc/sensu/ssl/sensu-backend-vault.pem",
"client_key": "/etc/sensu/ssl/sensu-backend-vault-key.pem",
"cname": "sensu-backend.example.com"
},
"max_retries": 2,
"timeout": "20s",
"rate_limiter": {
"limit": 10,
"burst": 100
}
}
}
}The certificate you specify for tls.client_cert should be the same certificate you configured in your Vault for certificate authentication.
Next, create your Vault secret.
Create your Vault secret
First, retrieve your PagerDuty Integration Key (the secret you will set up in Vault).
Next, open a new terminal and run vault kv put secret/pagerduty key=<integration_key>.
Replace <integration_key> with your PagerDuty Integration Key.
This writes your secret into Vault.
In this example, the name of the secret is pagerduty.
The pagerduty secret contains a key, and you specified that the key value is your PagerDuty Integration Key.
NOTE: The Vault dev server is preconfigured with the secret keyspace already set up, so we recommend using the secret/ path for the id value while you are learning and getting started with Vault secrets management.
This example uses the id format for the Vault KV Secrets Engine v1: secret/pagerduty#key.
If you are using the Vault KV Secrets Engine v2, the format is secrets/sensu#pagerduty#key.
Run vault kv get secret/pagerduty to view the secret you just set up.
Use sensuctl create to create your vault secret:
cat << EOF | sensuctl create
---
type: Secret
api_version: secrets/v1
metadata:
  name: pagerduty_key
spec:
  id: secret/pagerduty#key
  provider: vault
EOF
cat << EOF | sensuctl create
{
"type": "Secret",
"api_version": "secrets/v1",
"metadata": {
"name": "pagerduty_key"
},
"spec": {
"id": "secret/pagerduty#key",
"provider": "vault"
}
}
EOFNow you can securely pass your PagerDuty Integration Key in the handlers, and mutators by referring to the pagerduty_key secret.
Continue to the add a handler section to use the pagerduty_key secret in your handler definition.
Add a handler
Register the sensu/sensu-pagerduty-handler dynamic runtime asset
To begin, register the sensu/sensu-pagerduty-handler dynamic runtime asset with sensuctl asset add:
sensuctl asset add sensu/sensu-pagerduty-handler:2.2.0 -r pagerduty-handlerThis example uses the -r (rename) flag to specify a shorter name for the dynamic runtime asset: pagerduty-handler.
NOTE: You can adjust the dynamic runtime asset definition according to your Sensu configuration if needed.
Run sensuctl asset list --format yaml to confirm that the dynamic runtime asset is ready to use.
With this handler, Sensu can trigger and resolve PagerDuty incidents. However, you still need to add your secret to the handler spec so that it requires your backend to request secrets from your secrets provider.
Add your secret to the handler spec
To create a handler definition that uses your pagerduty_key secret, run:
cat << EOF | sensuctl create
---
api_version: core/v2
type: Handler
metadata:
  name: pagerduty
spec:
  type: pipe
  command: pagerduty-handler --token $PD_TOKEN
  secrets:
  - name: PD_TOKEN
    secret: pagerduty_key
  runtime_assets:
  - pagerduty-handler
  timeout: 10
EOF
cat << EOF | sensuctl create
{
"api_version": "core/v2",
"type": "Handler",
"metadata": {
"name": "pagerduty"
},
"spec": {
"type": "pipe",
"command": "pagerduty-handler --token $PD_TOKEN",
"secrets": [
{
"name": "PD_TOKEN",
"secret": "pagerduty_key"
}
],
"runtime_assets": [
"pagerduty-handler"
],
"timeout": 10
}
}
EOFConfigure a pipeline
Now that your handler is set up and Sensu can create incidents in PagerDuty, you can configure a pipeline to start receiving alerts based on the events your checks create. A single pipeline workflow can include one or more filters, one mutator, and one handler.
In this case, the pipeline will include the built-in is_incident event filter and the pagerduty handler you created in the previous step.
You can add this pipeline to any check to receive a PagerDuty alert for every warning (1) or critical (2) event the check generates, as well as for resolution events.
To create the pipeline, run:
cat << EOF | sensuctl create
---
type: Pipeline
api_version: core/v2
metadata:
  name: incident_alerts
spec:
  workflows:
  - name: pagerduty_incidents
    filters:
    - name: is_incident
      type: EventFilter
      api_version: core/v2
    handler:
      name: pagerduty
      type: Handler
      api_version: core/v2
EOF
cat << EOF | sensuctl create
{
"type": "Pipeline",
"api_version": "core/v2",
"metadata": {
"name": "incident_alerts"
},
"spec": {
"workflows": [
{
"name": "pagerduty_incidents",
"filters": [
{
"name": "is_incident",
"type": "EventFilter",
"api_version": "core/v2"
}
],
"handler": {
"name": "pagerduty",
"type": "Handler",
"api_version": "core/v2"
}
}
]
}
}
EOFTo automate this workflow, include the incident_alerts pipeline in any Sensu check definition in the check’s pipelines attribute.
When you list a pipeline in a check definition, all the observability events that the check produces will be processed according to the pipeline’s workflows.
Next steps
Add your pipeline to any check to start receiving PagerDuty alerts based on observability event data. Read Send PagerDuty alerts with Sensu for an example that shows how to edit a check definition to add a pipeline.
Read the secrets or secrets providers reference for in-depth secrets management documentation.